 Save
Save I'll never forget the Halloween party three years ago when my sister showed up with this creepy-cool skull dip, and every single person at the table went straight for it. Kids were giggling, adults were sneaking extra spoonfuls, and suddenly this simple spread became the star of the show. That's when I realized the magic wasn't just in the taste—it was in how food can make a moment feel playful and memorable. Now I make it every October, and it never fails to get a laugh and disappear faster than the trick-or-treaters.
The first time I made this for my nephew's school Halloween party, I arrived at the gym feeling nervous about whether anyone would actually eat it. Within ten minutes, there was a crowd around the platter, and I watched a shy second-grader confidently point to each vegetable and name it like he was a botanist. His confidence came from the fun of the presentation, and that's when I understood how food shaped into something playful opens people up in the sweetest ways.
Ingredients
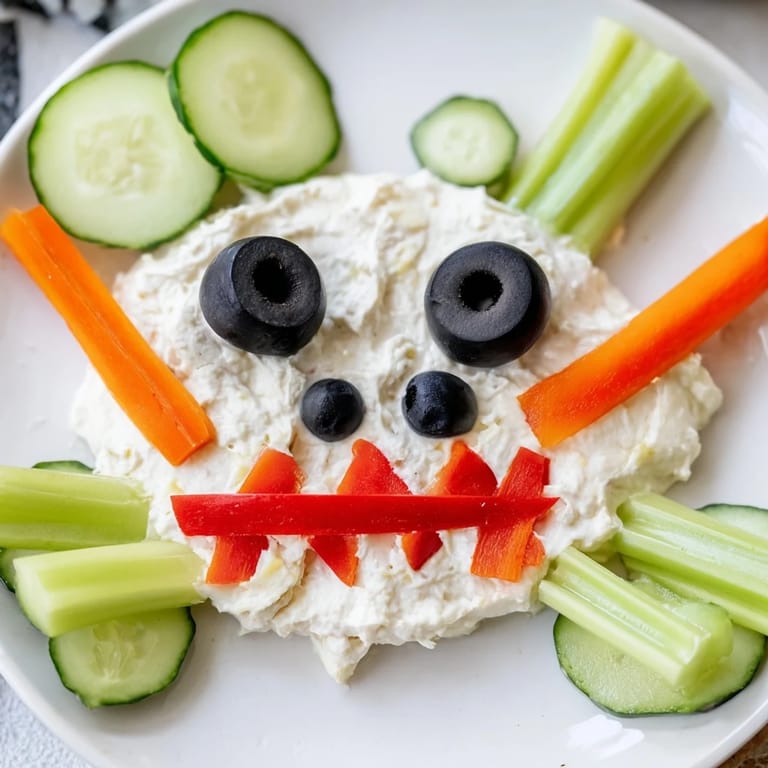
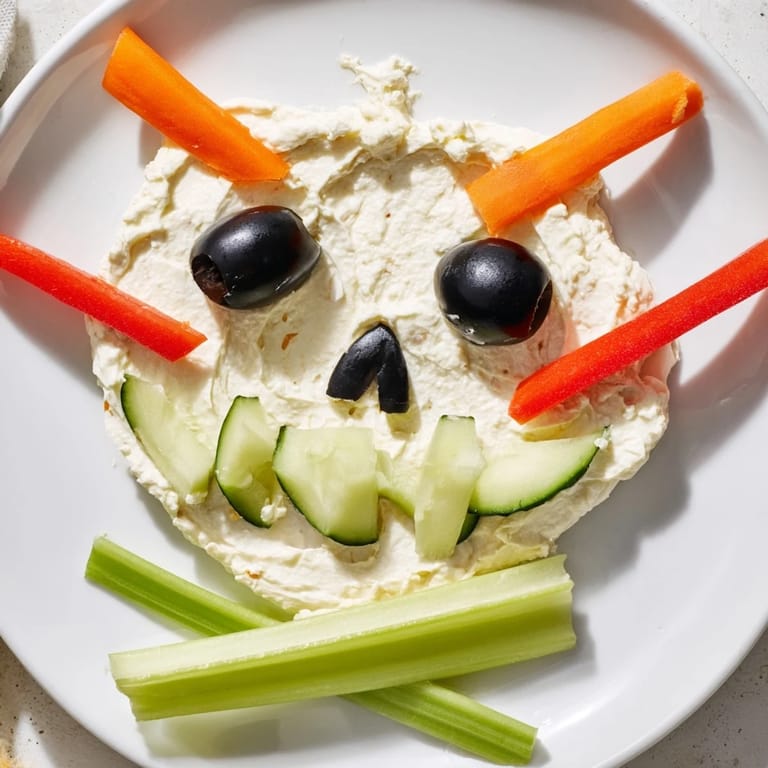
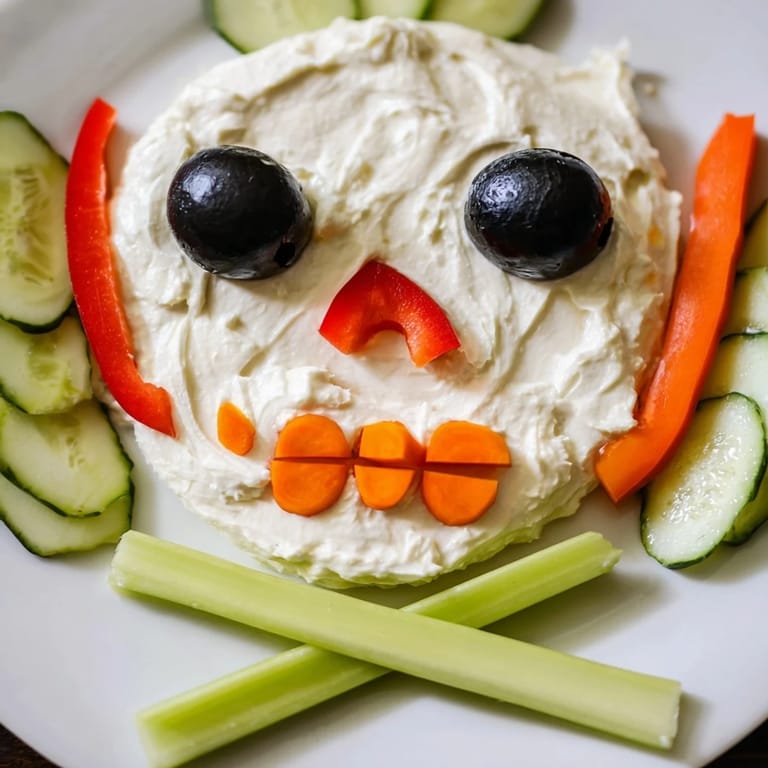
- Cream cheese, softened (225 g): This is your base, and softening it first is non-negotiable—it makes mixing smooth and easy, and prevents lumpy spots that nobody enjoys
- Sour cream (2 tbsp): A little tangy magic that lightens the spread and keeps it creamy enough to work with as a canvas
- Garlic powder (1 tsp): Don't skip this—it gives the spread savory depth so it doesn't taste like plain sweetness
- Lemon juice (1 tsp): Brightens everything up and prevents that heavy dairy feeling
- Salt and pepper, to taste: Always season to your preference; some batches need a pinch more than others
- Cucumber, sliced into rounds (1 small): Adds that garden-fresh crunch and sits perfectly as cheeks or facial features
- Red bell pepper strips: These become a bright, crispy mouth full of flavor—they're the star of the expression
- Black olives, halved (2 large): Obvious choice for eyes, but their briny flavor adds complexity to every bite
- Carrot, sliced and shaped (1 small): The rounds work as teeth, and small shards become a nose—carrots are surprisingly versatile here
- Celery sticks or breadsticks (2-4 long): Form those iconic crossbones underneath; celery is crisper and more authentic, but breadsticks are fun for texture variety
- Fresh parsley or chives (optional): A light garnish that adds a whisper of color and freshness if you want to show off
Tired of Takeout? 🥡
Get 10 meals you can make faster than delivery arrives. Seriously.
One email. No spam. Unsubscribe anytime.
Instructions
- Make the creamy foundation:
- In a medium bowl, combine the softened cream cheese, sour cream, garlic powder, lemon juice, salt, and pepper. Mix slowly at first so you don't splash, then beat it until it's completely smooth with no lumps hiding anywhere. This is your canvas, so spend a moment getting it right.
- Shape the skull:
- Grab your spatula and scoop the spread onto the center of your serving platter. Now here's the meditative part—use the spatula to gently shape it into an oval skull form, like you're sculpting with frosting. Smooth the top and sides so it looks intentional. Don't worry about perfection; a little irregular actually reads as more authentic and creepy.
- Position the crossbones:
- Lay your celery sticks or breadsticks in an X shape underneath the bottom of your skull, so they look like they're supporting it. This is your moment to feel like you're arranging a pirate's treasure or an actual skeleton—lean into the theater of it.
- Create the face:
- Place the black olive halves for the eyes, spacing them so they look like they're staring directly at anyone approaching. Add a carrot piece or small olive for the nose in the center. Now arrange the red pepper strips in a jagged mouth shape and line carrot rounds like teeth. Step back and look—does it feel spooky enough?
- Build the personality:
- Fill in the rest of the skull features with cucumber slices along the sides, maybe some extra carrot rounds, whatever feels right. Each vegetable is a detail that makes this thing come alive. Some people say their versions look friendly; others go full horror-movie vibes. That's the fun part.
- Final touches and chill:
- Sprinkle parsley or chives across the top if you want to add a living, fresh element. Cover loosely with plastic wrap and refrigerate until party time. Serve with crackers, pita chips, or extra veggie dippers on the side so people can scoop and dunk.
 Save
Save I remember my mom watching me arrange the face for the first time and laughing at how seriously I was treating it. She told me that the best parties weren't the ones with fancy food—they were the ones where people felt like someone cared enough to make them smile. This little skull spread taught me that food doesn't have to be complicated to be meaningful; sometimes it just needs a little personality and a platter.
Why This Works as a Party Star
There's something almost magical about appetizers that double as centerpieces. This skull spread isn't just sitting there—it's a conversation starter, a joke without words, a reason for people to gather around the platter and interact with their food. It breaks the ice at awkward moments and feels celebratory without trying too hard. Plus, because there's literally no cooking involved, you can make it an hour before guests arrive and just keep it chilled, which means you're free to actually enjoy the party instead of panicking in the kitchen.
Customization and Flavor Play
Once you've nailed the base spread, you have so much room to make it yours. Herbed cream cheese adds depth, fresh chives bring a mild onion note, a tiny pinch of cayenne gives spice, or a touch of honey balances the savory. Some years I swap in sriracha for a hint of heat, other times I keep it pure and simple. The beauty is that the spread is forgiving—it's a blank canvas waiting for your fingerprints. Think about what your crowd loves, taste as you go, and don't be afraid to adjust the seasoning to match your kitchen's style.
Serving Ideas and Crowd Pleasing
Set this skull out alongside a variety of dippers and watch people's faces light up. Assorted crackers offer that satisfying crunch, pita chips bring a bit more substance, sliced vegetables let the veggie-first folks feel good about their choices, and breadsticks add height to the spread's footprint. The key is giving people options so everyone feels welcome. If you're serving kids, the fun of it often outweighs any dietary preferences—they're eating vegetables and actually excited about it, which feels like a parenting win. For adult gatherings, set it out before cocktails arrive; people will graze and fill up on creamy, garlicky goodness while they mingle.
- Pair it with a mix of different crackers—plain, seeded, and herb varieties all work beautifully
- Add a small bowl of cocktail picks nearby so people can stab and lift without getting fingers messy
- Keep extra vegetables cut and ready in case the spread gets popular and you need to refresh the platter mid-party
 Save
Save Every Halloween, this little skull makes an appearance on my platter, and every time it reminds me that food is really about connection. It's not fancy, it doesn't demand culinary expertise, but it shows up with personality and joy, and somehow that's always exactly what's needed.
Kitchen Questions
- → What ingredients create the creamy base?
Cream cheese blended with sour cream, garlic powder, lemon juice, salt, and pepper forms a smooth and tangy base for the spread.
- → How is the skull shape formed?
The cream cheese mixture is shaped into an oval on a platter to resemble a skull, then decorated with vegetables to highlight facial features.
- → Which vegetables are used for decoration?
Cucumber slices, red bell pepper strips, black olive halves, carrot rounds, and celery sticks create eyes, nose, mouth, and crossbones.
- → Can this dish accommodate gluten-free diets?
Yes, using celery sticks or gluten-free breadsticks for the crossbones ensures a gluten-free option.
- → How should this spread be served?
Chilled and accompanied by assorted crackers, pita chips, or sliced vegetables for dipping and added crunch.
- → Are there any possible allergen concerns?
The spread contains dairy from cream cheese and sour cream; breadsticks may contain gluten, so check labels carefully.