 Save
Save The first time I pressed a grilled cheese into a waffle maker, I wasn't even sure it would work—I just knew I was tired of the same flat sandwich. Those crispy, checkerboard ridges that came out were pure magic, golden and crunchy in a way no skillet could ever achieve. It became my go-to lunch when I needed something that felt special but took barely ten minutes. The waffle maker has since become my secret weapon for transforming simple ingredients into something unexpectedly delicious.
I made this for my roommate on a rainy Tuesday when she said she was too hungry to wait for takeout. Watching her face light up when she bit into those crispy corners was worth every second. She's been asking me to make it ever since, and now it's become our default lunch when we're both working from home.
Ingredients
- Bread: Use whatever you have—white, whole wheat, or sourdough all work, though thicker slices hold up better to the waffle maker's heat and won't get crushed.
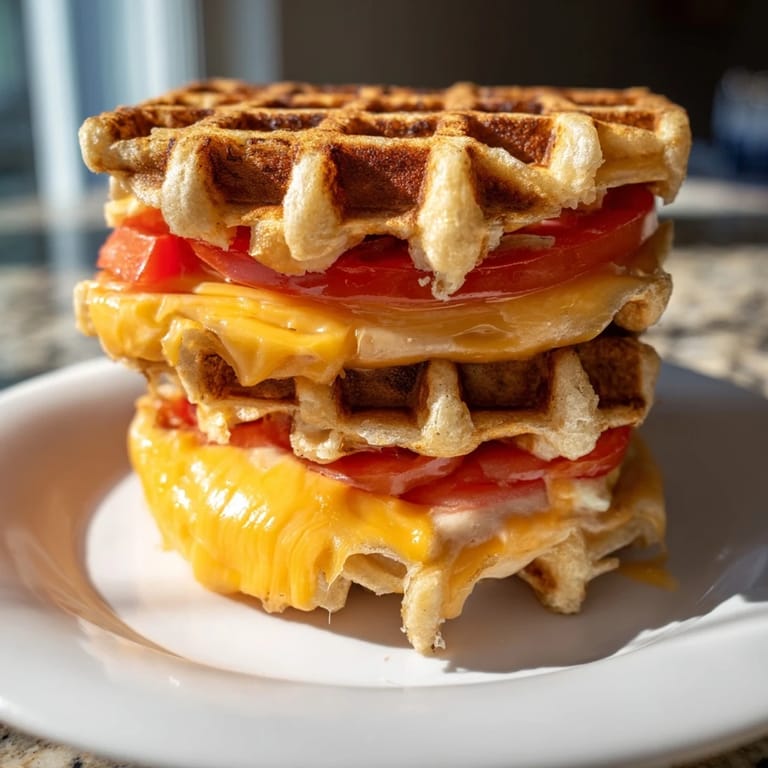
- Cheese: Cheddar is the classic choice, but Gruyère melts like a dream and Swiss adds a subtle nuttiness that feels fancy without trying.
- Butter: Softened butter spreads easily and browns evenly, creating those golden-brown exteriors that make this recipe special.
- Tomato slices: Optional but they add brightness and moisture, especially if you're using drier cheeses.
- Cooked bacon: A few strips turn this into something you'd order at a deli, and the salt plays beautifully with melted cheese.
- Dijon mustard: Just a teaspoon adds a sophisticated tang that cuts through the richness without overpowering the cheese.
Tired of Takeout? 🥡
Get 10 meals you can make faster than delivery arrives. Seriously.
One email. No spam. Unsubscribe anytime.
Instructions
- Heat your waffle maker:
- Most waffle makers take about two minutes to preheat, and you'll know it's ready when the light indicator changes. Don't skip this step—a properly heated surface is what creates those crispy, golden ridges.
- Butter each slice:
- Spread a thin, even layer on one side of each bread slice using a butter knife. This is the barrier between the bread and the waffle maker's heat, so consistency matters.
- Build your sandwich:
- Place two slices buttered side down on the counter, layer two slices of cheese on each, add any extras you're using, then top with the remaining bread slices buttered side up. The butter on the outside is what gets crispy.
- Press and cook:
- Gently place one sandwich into the waffle maker and close the lid without forcing it—the weight of the lid is usually enough. You'll hear it start to sizzle within seconds, and after three to five minutes, the bread should be golden and the cheese molten beneath.
- Remove and rest:
- Use a butter knife or small spatula to gently lift the sandwich out, as it will be hot and delicate. A minute of cooling lets the cheese set slightly so it doesn't spill out when you slice it diagonally.
 Save
Save There's a quiet comfort in knowing that something this satisfying can come together so quickly. It's become my answer when someone says they're hungry but also tired, because this sandwich somehow feels both simple and indulgent at the same time.
Why the Waffle Maker Changes Everything
A regular skillet gives you a flat sandwich with soft edges. A waffle maker gives you structure—those ridges aren't just pretty, they're functional. They catch and hold melted cheese, they create more surface area for browning, and they give every bite that satisfying crunch. The transformation feels almost scientific, like you've unlocked a secret upgrade to something you thought you already knew.
Variations and Mix-ins
Once you've made this basic version, you start seeing possibilities everywhere. I've layered in caramelized onions that became jammy and sweet, added crispy bacon for a BLT energy, and even tried a thin spread of pesto that turned it into something Mediterranean. The beauty is that the waffle maker technique works with whatever you want to tuck inside—it's just a vehicle for getting things crispy and warm.
Serving and Pairing Ideas
Eat it straight from the waffle maker if you can't wait, or plate it with something that balances the richness. A sharp tomato soup is the classic pairing, but I'm just as happy with a simple green salad with a vinegary dressing that cuts through the butter and cheese. Some people serve it as a side to soup; I've been known to make it for lunch and call it dinner.
- Slice it diagonally for that satisfying presentation and easier eating.
- Serve immediately while the cheese is still stretchy and the edges are still snapping with crispness.
- Have napkins nearby because the butter and melted cheese make this beautifully messy to eat.
 Save
Save This sandwich is proof that sometimes the best meals come from the simplest combinations and a willingness to try something slightly different. Make it once and you'll understand why it's become such a reliable favorite in my kitchen.
Kitchen Questions
- → What type of bread works best?
Sandwich loaves like white, whole wheat, or sourdough all crisp nicely in the waffle maker and hold the filling well.
- → Can I use different cheeses?
Yes, cheeses that melt well, such as cheddar, Gruyère, mozzarella, or Swiss, create a gooey interior while toasting beautifully.
- → How long should I cook the sandwich?
Press in the waffle maker for about 3 to 5 minutes until the bread is golden brown and the cheese is melted.
- → Are there add-ins to enhance flavor?
Optional additions like tomato slices, cooked bacon, or a smear of Dijon mustard add layers of taste and texture.
- → How can I make the sandwich crispier?
Using softened butter on the outside bread surface before pressing helps achieve a golden, crunchy crust.