Save
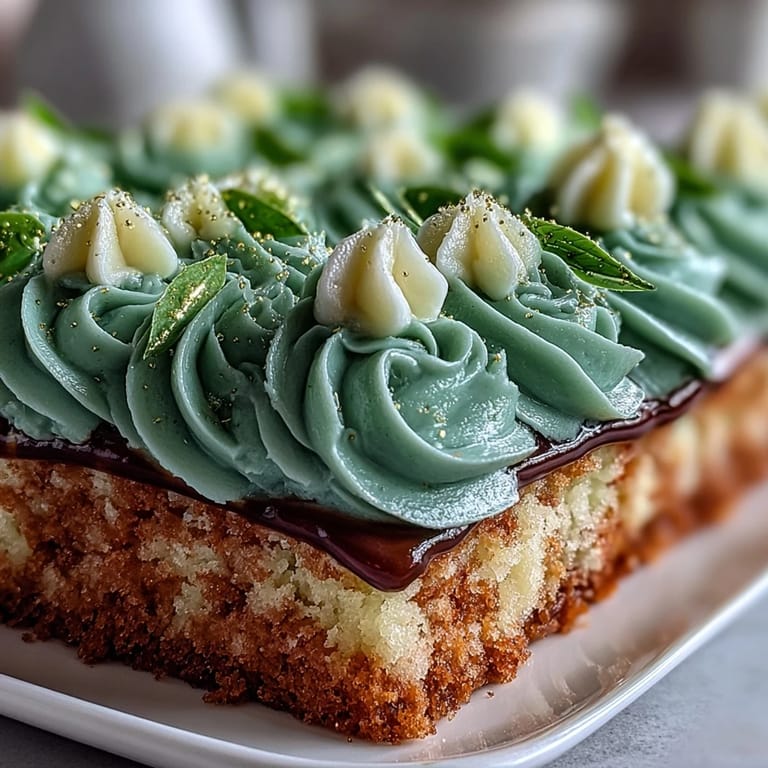
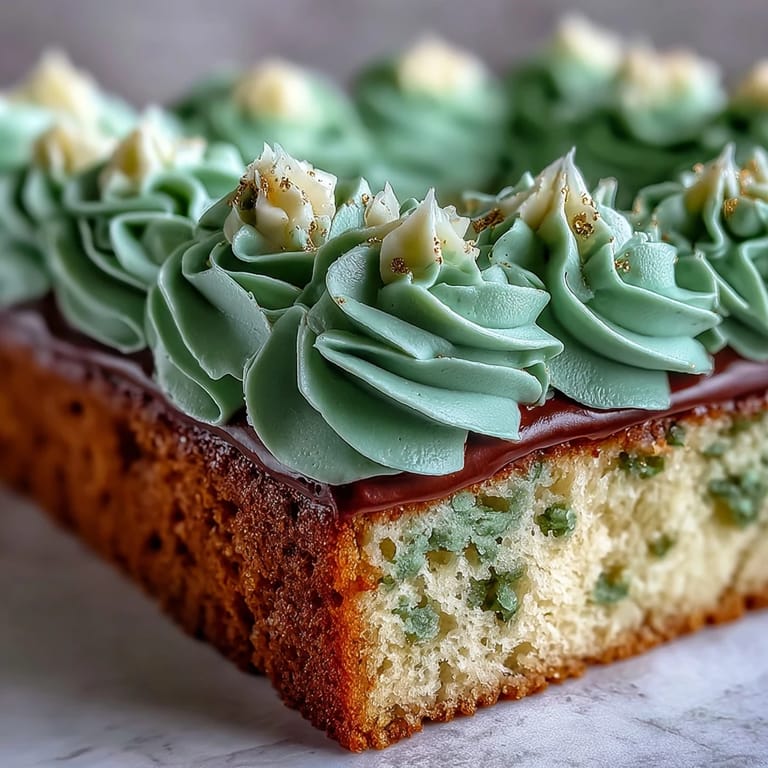
Save The first time I attempted a sage green buttercream, I was surrounded by open windows, letting a soft early summer breeze lift the scent of vanilla throughout the kitchen. I couldn't help but laugh when my fingers ended up tinted green from testing the coloring—an accidental badge of creativity. The palette of this cake feels celebratory in its own right, with the gold flecks catching the afternoon light. Compared to the usual cupcakes and cookies, this sheet cake instantly set a different tone for the festivities. It promised a centerpiece, not just a dessert.
I still remember the light-hearted chaos in the kitchen the morning of my cousin's graduation party—ribbons of parchment paper, clanging mixing bowls, and someone sneaking spoonfuls of buttercream when they thought I wasn't watching. There was something special about all of us huddled over the cake, debating exactly how many gold accents felt festive without heading into over-the-top territory. In the end, every swirl and brushstroke felt like a small act of celebration. By the time we carried the cake to the table, even the most skeptical relatives were already asking who did the decorating. Watching proud smiles and surprise at the first forkful made every bit of prep feel worthwhile.
Ingredients
- All-purpose flour: Provides structure; spoon and level for best results and to keep the cake light.
- Baking powder: Ensures the sheet cake rises evenly; make sure it's fresh for a tender crumb.
- Salt: Just a pinch brings out the vanilla and balances the sweetness.
- Unsalted butter: Room temperature is key for both cake and buttercream to whip up smoothly.
- Granulated sugar: Creaming it well with the butter helps achieve a soft, fluffy texture.
- Eggs: Let them sit out to reach room temperature so they blend seamlessly into the batter.
- Pure vanilla extract: Don't skimp—it layers in warmth and depth that ties the flavors together.
- Whole milk: Adding richness and moisture, it's best if slightly warmed so it doesn't seize the batter.
- Powdered sugar: Sift to avoid lumps; it helps the buttercream glide across the cake.
- Heavy cream or milk: A little at a time makes the buttercream dreamy and spreadable.
- Sage green gel food coloring: Start slowly, swirling in just enough for an elegant pastel hue.
- Gold edible luster dust: Brings shimmer and sophistication—mix carefully with clear extract for painting details.
Tired of Takeout? 🥡
Get 10 meals you can make faster than delivery arrives. Seriously.
One email. No spam. Unsubscribe anytime.
Instructions
- Prepare the Oven and Pan:
- Preheat to 350°F and line your sheet pan with parchment, letting the corners drape for easy release.
- Mix the Dry Ingredients:
- Whisk flour, baking powder, and salt together; this step really prevents pesky clumps later.
- Cream Butter and Sugar:
- Beat at medium speed until fluffy; you should see the color lighten and almost hear the texture change.
- Add Eggs and Vanilla:
- Crack eggs in one by one, scraping the bowl after each, then pour in vanilla for that warm bakery aroma.
- Alternate Dry and Wet Ingredients:
- Gently mix in the flour and milk, starting and ending with flour to keep the batter from deflating.
- Bake the Cake:
- Pour into the pan, smooth out, and bake until a toothpick slides out clean and the top springs back—a little patience!
- Buttercream Time:
- Beat butter until velvety, then add powdered sugar slowly; adjust the consistency with cream for perfect spreading.
- Tint and Decorate:
- Add sage green gel, mix evenly, and set aside a small bowl of plain buttercream for gold details.
- Frost and Finish:
- Spread the green buttercream over the cooled cake, creating smooth waves or rustic swoops with your spatula.
- Add Gold Accents:
- Mix luster dust with a drop of extract, then use a clean brush to paint it on piped details or swirls for a luminous finish.
- Optional Graduation Touches:
- Use piping bags or fun sprinkles to add caps, diplomas, or whatever symbols fit your celebration best.
 Save
Save  Save
Save At the party, I watched the graduate examine the cake before taking a picture, grinning over the reflective gold flickers and the stenciled year. There was a hush during the first slice, and somehow the entire cake disappeared faster than the congratulations—it's funny how food memories linger after the last crumb is gone.
Choosing Your Celebration Colors
Sage green and gold have a gentle elegance, but I've experimented with navy, blush, and even bold purple to match school themes. Test a dab of food coloring on a plate first—sometimes a little goes further than expected, and it saves you from over-tinting the whole batch.
Decorating With Buttercream Like a Pro
For the gold, use a very soft brush and short strokes so you don't disturb the surface too much. I found it helps to chill the piped details briefly before painting them—less smudging, more sparkle to admire!
Making It Ahead for Stress-Free Celebrations
You can bake the cake, wrap it tightly, and freeze it up to a week ahead—just let it thaw before frosting for best texture. The buttercream itself holds up in the fridge for days, ready for spur-of-the-moment decoration quests. Don't forget to factor in extra time for any creative embellishments, especially the gold painting part.
- Let the pan cool on a rack before removing the cake.
- If you're short on time, use a store-bought gold spray for quick accents.
- Cover leftovers tightly; the cake stays soft for days.
 Save
Save  Save
Save Celebration cakes often become the backdrop for happy photos, but this one tends to become the conversation itself. Wishing you golden memories—and maybe a few green-tipped fingers along the way.
Kitchen Questions
- → How do I get an even sage green color?
Use gel food coloring for vivid color with minimal liquid. Add a little at a time to the buttercream, mix thoroughly and test on a small spoon; color deepens slightly after resting.
- → Can I make the buttercream less sweet?
Reduce powdered sugar slightly and add a pinch more salt or a splash of lemon juice to balance sweetness. Adjust cream to maintain spreadable consistency.
- → How should I apply the gold accents?
Mix edible luster dust with a few drops of clear vanilla or vodka for a paintable mix, then use a food-safe brush to paint piped details. Alternatively, fold dust into reserved buttercream for a marbled gold effect.
- → What's the best way to ensure neat squares when slicing?
Chill the iced sheet briefly until the buttercream firms, then use a sharp knife wiped between cuts or a warmed metal spatula for clean edges and even portions.
- → Can I swap ingredients for dietary needs?
Use gluten-free flour blend for a gluten-free version and check liquid adjustments. For dairy-free, substitute plant-based butter and milk alternatives, though texture may vary.
- → How long can the decorated sheet keep?
Store covered at room temperature for up to 24 hours in cool conditions; refrigerate for up to 3 days. Bring to room temperature before serving for best texture.